Wednesday, October 15, 2014

Quick Therapy

After a couple difficult weeks at work and then the church District-wide conference Friday evening and all day Saturday, I was ready to blow a gasket. First, on the way home from the conference on Saturday, I squeezed in a 4 mile hike to burn off some energy. Then after slacking for dinner by buying a pizza on the way home, I grabbed the yarns I bought in September at the Fiber Fest at Young's Dairy.
Winding it into balls was an interesting endeavor. I whined and complained to my oldest, a knitter, for quite a while. She told me to get over it. But it would have been infinitely easier with her swift and winder. Or at least an extra set of hands. 

I spread newspaper on the floor, laid out 72" of Sulky wash-away stabilizer, sprayed it with Sulky temporary adhesive and started randomly laying out the silk strip yarn. Then I layered the spun sari silk yarn on top. I sprayed it again, and then sandwiched a top layer of the stabilizer on top. (sorry, I hurt too bad crawling on the floor for an hour dorking with it, I didn't think of getting a picture of that!

 I added pins every few inches to keep it together. and started stitching in long rows to hold it together. I also stitched across the ends pretty early on. All in an effort to keep it from shifting too much. It still shifted, but it didn't end up being a big deal - I just re-arranged it while stitching.


Here's a close-up of stitching the sandwich.

I chose an interesting rayon thread I happened to have on hand by Coats & Clark, "Twist Rayon". It had pinks, teals, purples. While the colors faded from one to the other, there were always 2 colors twisted together, so it looks nice on the mixed yarns.

After washing it for 4 minutes in the washer on the super-gentle handwash cycle, I pulled it out, hung it on a hanger in the shower overnight, and it was ready to wear the next morning! It took about 2 hours total, and I felt so much better after completing it! I always feel better when I have time to sew!

Wednesday, September 24, 2014

Lingerie Laundry Bag

At Sewing Guild meeting last week, I demonstrated my travel organizer and another lady demonstrated a similar bag for washing lingerie. It is made with tulle, decorated with lace and closed with a zipper. It's made pretty much the same way as my travel organizer except the last step of boxing the corners is left out.
At some point in the chapter's history, someone has donated a bolt of tulle and a bunch of lace. I brought home a piece of tulle and a few pieces of lace. I made a laundry bag for my oldest daughter. And just made a second one tonight as a baby shower gift for a family at church. I'll put some baby socks in it for the gift. Those silly, adorable, tiny socks always get lost in the wash. Hopefully, they'll appreciate the bag.

Here's the bag:

I selected the size based on the tulle I received. It was about 12" wide. The tulle is doubled. I sandwiched the lace with the zipper, sewed it, then flipped it and topstitched.
The next size of the zipper was flipped around, but this time, I just put wrong side of the tulle (inside of bag) on top of the zipper tape. I figured out which side went with which by laying it together and pinned.
 Then I unzipped, pinned it the rest of the way and topstitched. Then it's just zipping most of the way, leaving a bit open to turn right side out later, bar-tacking the zipper at the edge of the tulle, and cutting off the extra zipper length. Stitch up the sides and you're done. I did take the time to zig-zag the edges to make it tidy. I was too lazy to change the serger to white thread, but that would be a very slick finish.
And done:


Sunday, September 14, 2014

Travel cubes aka Packing organizers

Travel cubes are popular, but expensive. I have used drawstring bags to sort and organize clothing in a suitcase, but these work better. They make it easier to keep your packing focused/light and definitely easier to pack everything. I usually put tops in a medium sized, bottoms in large and undergarments in a couple smaller ones. Tossing in my shoes (which I put in newspaper plastic rain sleeves) on the bottom, toiletry bag (which is always packed) and then the packing cubes, I'm done really quickly. And if TSA roots through my stuff, I don't have to worry about things getting handled much. Yes, officially they could open them up and root through them, but frankly, they're probably not going to bother. 

You can make them any size. Google "travel cube" or "packing organizer" and you'll get a plethora of selections. Or you can look at them at Target, etc. You can pick a size from any of them, the sizing is pretty simple to calculate, just use your own desired Height/Depth/Width measurements. Here's a couple size suggestions:

Small - finished size approx 6" x 2" x 6" (Height x Depth x Width)
Medium - finished size approx 12" x 4" x 7"
(because the zipper takes up a little length, sizes are approximate)

Supplies:
Small - (1) 10" x 9" (Height x Width) fabric
           (1)  7" x  9" (H x W) mesh
           (1) zipper at least 9" long (W) - easiest to use longer and cut off excess

Medium - (1) 19" x 12" (H x W) fabric
               (1)  13" x 12" (H x W) mesh
               (1) zipper at least 12" long (W) - easiest to use longer and cut off excess

(at end of posting, I have the calculations you need to select your own size)


1. Right sides together, place short side of fabric on zipper and stitch.


2. Flip zipper over place short side of mesh on top, 
matching edges with fabric piece. Stitch short side of mesh
to right side of zipper.


3. Open the zipper at least 4-5" so you can turn it right side out later!

4. Right sides together, match all edges. The zipper will be a little more than half the Depth down from the top. Stitch the open edges. Finger crease the top edge enough to locate it in the next step. If you're nervous the zipper will come apart, zig zag across the teeth inside the seam allowance. Trim off the zipper ends.


5. To box the corners, about 4-6" diagonally in from the bottom corner, grab front and back and separate, the corner will look like a cone or 4-sided pyramid. Line up the corner side seam with the corner bottom seam. Flatten into a triangle. You will stitch across the triangle. Use a ruler to lay across the triangle until the stitching line is the Depth you chose - this is where you stitch. Repeat for other corner.


6. The top corners are done the same as the bottom
corners. Make a triangle out of the corner and stitch as close as you can to the zipper tape. If you want a loop handle, from the inside, you can tuck it in one of the top corners before stitching.


7. Turn right side out, pushing out the corners.
You're done!

This medium sized travel cube has 4 t-shirts folded inside.


If you want a different size, calculate needed fabric/mesh by knowing what finished size you want (Height x Width x Depth - H x W x D):

1) Fabric = cut a piece H + D + 1/2D + 1"   by  W + D + 1"
2) Mesh =  cut a piece   H + 1"                     by W + D + 1"
3) Zipper = at least W at minimum

           For example: if I want a large cube 15" x 10" that is 6" deep (H=15, W=10, D=6), I would cut
                                fabric 24" x 17"  (15 + 5 + 3 + 1  by  10 + 6 + 1)
                                mesh  16" x 17" (15 + 1  by  10 + 6 + 1)
                                zipper has to be at least 10" long.

Sunday, September 7, 2014

Bruce Seeds and the One-Block Wonder

After getting permission from the subject artist, I wrote this for our ASG (American Sewing Guild) May newsletter. I'm more than a little slow at posting it on my own blog. Love seeing Bruce Seeds' work, I think I may have to make a quilt yet! Here's the article, along with pictures of two of his quilts. Below the article, I have my own version as well:

Bruce Seeds and the One-Block Wonder
I am not a quilter, although I've long admired the artistry. I even made a signature quilt for each of my three children to commemorate high school graduation, however I was uninterested in doing more. But I was intrigued when I was introduced to Bruce Seeds' work on a Sewing With Nancy episode, probably in 2012. He was an architect suffering from a strained economy who did web design, when he was at a quilt shop in 2008 with his mother and saw Maxine Rosenthal's book "One Block Wonders". He creates what he terms "quilted textile mosaics" from fabric which has large repeats. He proceeds to stack 6 repeats precisely together and cuts them into equilateral triangles. The resulting 6 matching triangles can be matched in 3 different possible kaleidoscopes. While the hexagons are individually fascinating, Bruce Seeds' particular genius is in his arrangement of all the hexagons together. According to his introduction at bruceseeds.com, "It's only when I get to the very end that I can see each quilt for what it wanted to be."
I was so taken by his work, it pursued my creative psyche ever since I saw it. I started following him on Facebook.  I bought the book and one of Bethany Reynold's "Stack-n-Whack" books which use similar techniques in multiple shapes. Again, I had no intention of quilting! But along came the ugly Christmas fabric challenge. The pattern was a bit small, but I thought I'd give it a try. I was glad for the push and pleased with the results. I'm leaning very heavily towards doing a full sized work.

Two of Bruce Seeds' work:
The Deep

Synapse


The inspiration of Bruce Seeds' work led to my own take on it... 


The "ugly Christmas fabric challenge" mentioned in the article was a guild challenge to any member who wanted to participate. You received a piece of this fabric and were challenged to make something with it. It's always good to force yourself be creative, so I accepted a piece of fabric.


I stacked 6 identical pieces, sliced them into equilateral triangles, then played with each set to find the kaleidoscope effect I liked best. Once two sets of three were stitched for each hexagon, I played with them until I found a grouping I liked. I didn't have enough fabric to do a center piece, so I dug in my stash and found a piece of maroon velvet to complete the project (leftover from a costume I made for a First Lady Lucy Hayes re-enactor!).
I liked how it came out. My mother bought some large print fabric on a family vacation to Hawaii which she's made into stack-n-whack quilt squares. She's currently putting it together. I lucked out and she left the fabric at my house, so this Fall or Winter, I'm going to attempt my own version. Yikes! When did I decide to do quilting??

Saturday, September 6, 2014

Dogs, Legos and clearing out scraps ...

Legos, Legos, everywhere!

Wanted to do some quick, immediate gratification projects today (instead of finishing the pants that need only a hook). The 21 year old boy was talking about needing an organization method for his (literally) thousands of Lego pieces.


I toyed with the idea for a while, and decided I could use the stiff interfacing I bought on a bolt in a lot at an auction. The pieces started out 5" squares, because I had it left over from his high school graduation quilt, and, I thought it would fit inside the under-the-bed plastic tub. Folded down the top about 1/4" before I serged it to make the edge stiff. We think it's too tall for easy access, so we folded it down. Not a bad prototype. Multiple sizes for multiple piece types might work. He's not sure, may try it for a while. Was a nice, quick project. Appropriately gratified, I moved on:


I've been watching my 11 year old poodle get grayer around the muzzle and more creaky when he gets up and down. I washed his bed a week or so ago and really noticed how beaten down the stuffing was. He's old, he's been a great hiking buddy, he deserves a soft bed. Like most things - I think how can I solve my problems with fabric? Well, I certainly have plenty of fabric - and a renewed interest in clearing out stuff. So, in 5 minutes I amassed quite the scrap pile of wools, fleeces, knits, cottons, even the remainder of a t-shirt I'd cut up for an earlier headband project. I also located a perfectly-sized piece of drapery lining to make the pillow case (yay! one huge cardboard tube gone too!).

The existing bed is 42" x 32" fake fur and fleece. I had just the right amount of drapery lining to fold into the pillow case. I used a weird peacock blue zipper I had on hand from somewhere (why did I have that and where did it come from?) and placed the zipper in one end, sewing around the other 3 sides. Squared up the pillow by sewing across the corners so when it's full, I can replace the pillow inside his bed with something washable.


I had a LOT of scraps ....


But they were too lumpy as-is, so I laid out piece after piece, whacking them into small bits with my rotary cutter.


The pile kept growing ...


It only filled it about a third of the way. I fluffed it in the dryer for a few minutes to get the bits distributed and separated. For now, I spread it out under the existing bed and it's much "cushier"! I think his old, creaky hips will appreciate it.  

Only on days when I sew do I feel like I accomplished anything. So this was an excellent day.


Sunday, August 3, 2014

That was easy

Dog got thirsty on a hike yesterday. I haven't been carrying my pack since doing some Colorado hiking and doing a number on my neck. Without his traveling  bowl (aka Chobani yogurt cup), I couldn't give him much in my cupped hands from my water bottle jammed in my pocket. Thank you Internet for innumerable DIY instructions!
See how easy it folds (I just had the clip for the picture).
And ... it worked!

Saturday, January 25, 2014

Catch Up!

Yeah, well, it turns out I'm not a prolific writer. Fortunately I'm a bit more prolific in the sewing arena. I was clearing pictures off my camera's card and realize maybe I HAVE completed some projects. So, I'm just going to post a lot of pics from the last year and a few comments. Then, I promise (read: have good intentions) to post more frequently.


I did these quite a while ago for a cousin's son who got married. They were going to be moving a lot so it needed to be small. I used a Kroger bag as a pattern for some re-usable grocery bags that fold into their attached pocket. Super easy on the serger once you puzzle through order of operations.

This was a fun little project. Cut an old t-shirt or yardage into 1-2" crossgrain strips. Pull on the strips until they curl. I taped them to the cutting board and did a 5-piece braid. I think I remember starting with pieces about 40" long and needed a finished braid somewhere between 20" and 25". Makes a nice wide headband if you start with strips 1-1/2 to 2" wide.
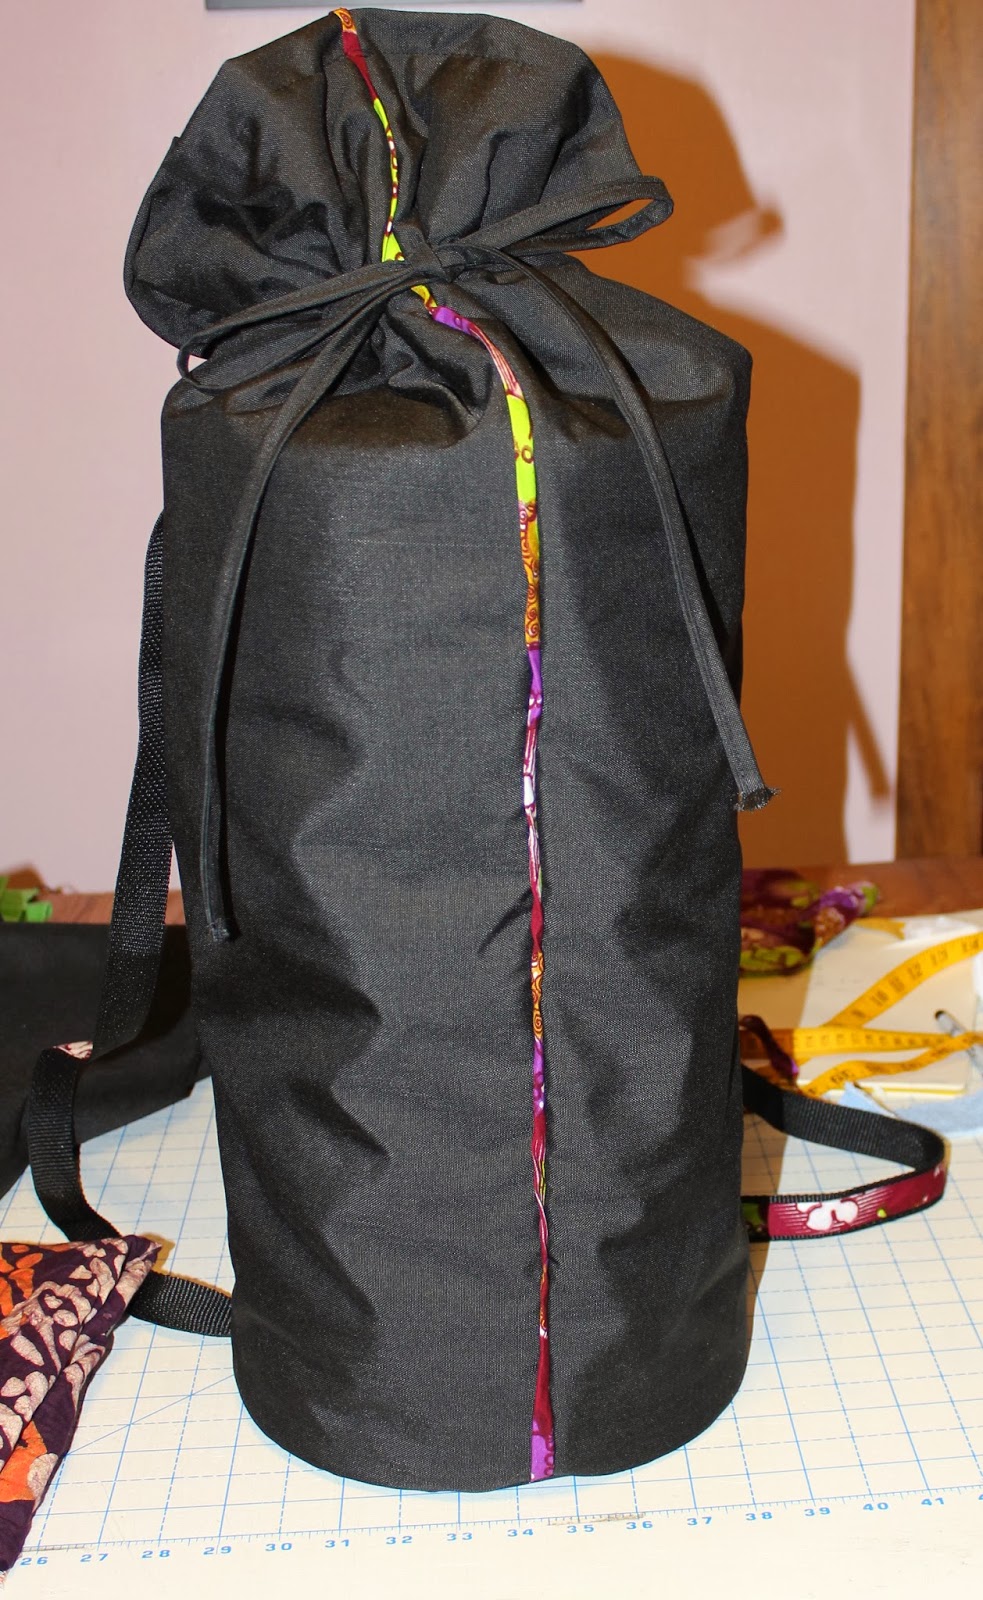
 One of the instruments my budding Music Therapist came home from Ghana with is a talking drum. She needed something to carry/protect it. I used cordura for the outside of the bag. Lined it with bright green flannel. Inserted a piece of foam at the bottom to protect the drum head. Then trimmed in some Ghanaian fabric she'd brought back - I used it to cover the webbing too. Does the trick.


 Her prof was wanting a device to hold a remote for Powerpoint presentations. This is a prototype, we couldn't figure out how to attach it to the guitar. There's a loop you can't see, but what do we use to attach to the guitar? It needs to be near the strumming hand. I'd love suggestions.


 See the theme yet? A lot of my sewing that I take pictures of is Music Therapy related lately. I had completed the guitar strap (top) a while ago. It's made of fabrics used for projects through the years, so there are a lot of memories on that strap. The middle strap is for her mandolin. It's a mix of fabrics brought home from Ghana. And the last is the shortest - it's for the ukelele. All fabrics purchased in Hawaii or for a Hawaii trip.

This was really fun. We purchased the cheapest straps from musiciansfriend.com, I de-constructed them, shortened when needed (and melted the raw edges), stripped together a bunch of fabrics on a piece of muslin, attached the strip to the strapping and re-constructed the straps. She put the hardware on the instruments that needed it and she's got dedicated straps to 3 instruments now.

I've done some sewing for others besides family too. I wanted to do a memory pillow for a friend. I got the picture off the t-shirt I'd worn on a walk to raise funds and honor all those who've donated organs to save the life of another. Check out Donate Life if you want to support the organization! And sign up when you renew your license! I also put his name from the t-shirt on the back of the pillow. I happened to have the perfect multi-color heart fabric. Spent some time creating the tucked trim with my ruffler foot and was really pleased how well it turned out. That thing looks like a dinosaur but it's sure slick once you get it going right. The right tool is worth every dime.  


I can't locate the pics of the christening gowns. But I did have this one ring-bearer pillow. I cut up a dear friend's wedding dress (gulp!) that was also her mother's wedding dress. I made 2 christening gowns, blankets, pillows and hankies from it. She particularly wanted me to use the lace and buttons from the dress. It was quite the challenge but a most excellent adventure in heirloom style sewing. Martha Pullen eat your heart out.


I entered a contest where you received 4 or 5 items that must be incorporated into the project. I received the zipper and 3 or 4 odd specialty threads. I had an inspired idea (courtesy a funny cartoon sent by my middle child) for an anxiety doll. But reading the fine print, I found I'd give up all rights to the idea. Not particularly inclined to do so, I whipped this up instead, cutting up the zipper into parts, making tassels from a weird thread. Of course it didn't win, but it was an amusing little exercise that stretched my view and use of supplies.

THIS (below) is the item I dreamed up when I received the contest supplies, but was unwilling to send off releasing all rights. I gave it to my favorite, anxious girl. My first doll-making attempt, it took at least 3 prototypes if I remember correctly. The "cape of escape" can be worn to hide from the world. Anxiety Annie sports spiral eyes, fuzzy eyebrows and her hair is strips of purple knit pulled until it spiraled on itself.  While she is "able to leap to the worst conclusions in a single bound", she is still dearly loved with a hidden heart under her t-shirt. By the way, anxious people sometimes make mistakes, see if you can find the one I made - that I saw AFTER I finished! Sigh.


Poor Anubis joined the family this winter and came to our house for Christmas with only a sweatshirt. Skinny thing was freezing when it hit the 20s (who knew that was going to be the WARM part of this winter??). I pulled out fleece scraps and fashioned a warm coat. And since the scraps were scarlet and grey(hound), I HAD to put a Block "O" on it!
This is just a stocking stuffer for the boy. To organize and hold power cords. Different sizes, different colors to keep them straight. Used some of the 50 yards of 3" black elastic I'd purchased for all the yoga pants I made for Christmas gifts. Prototypes, if they work well, I'll make some for all of us. 

This is my last big item I finished lately. Just in time for it to go back to college for her big senior recital in February. We scavenged the lower half from an old prom dress. We both still loved the fabric. I tried for the top part to be like another dress she likes a lot. It was a struggle but it will work well enough. The sparkly gold trim will look decent on stage and when it's pressed and she's fully dressed she'll look fabulous. She was just quickly modeling for a picture, moments before she went back to school. Had to add a strip at the bottom of the black at the last minute because she wanted to wear tall heels, which made the skirt too short! One of the reasons I like sewing is problem-solving and engineering, but whew, I only had itsy-bitsy scraps left! I'd say next time I'll plan better, but I know I won't. Happily it received the official OK from her vocal coach. I don't know what we would have done if it wasn't approved!

Well if you're read this far, you must really like sewing. Or you're morbidly curious what I do in my Frankenstein sewing room. I'll try to do shorter posts from now on. AND I'll try to figure out how to post with a little more creativity. But for now, this will have to do.